Use Bower In Your ASP.Net MVC Project
Modern client side development usually involves working with a large number of open source libraries. jQuery, Angular, Knockout, Meteor, and Backbone are some of the most popular, but more than likely you’ll also want to use a variety of others as well. When pulling these libraries into your project, it’s extremely important to do it in an organized, structured way. If you were to pull a 3rd party C# library into your project, you’d use NuGet because it manages what versions of the library you are going to use and it has a large selection to choose from. While NuGet is great for C# libraries, it is lacking in it’s choice of client side libraries.
Enter Bower
There is a large web development ecosystem that encompasses more than just the .Net world, and one of the most popular client side package managers used in that ecosystem is Bower.
Bower does necessitate having NodeJS installed, so if you haven’t done that yet head over to their download page and run the installer. This post won’t go into detail on how to use bower or node - there are a large amount of tutorials already on the web.
Using Bower, your client side dependencies will be managed much the same as your C# libraries are managed via NuGet.
Create the Solution
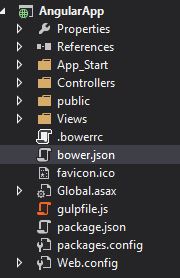 Overall Project Structure
I’m using Visual Studio 2013, but VS2012 will work as well. Create a new ASP.Net MVC project, and add a public folder to it. This folder will contain all of our Javascript, CSS, and images - all of which are publicly visible to anyone inspecting our website. Inside of that folder, add a app folder to contain our custom Javascript, a content folder to contain our stylesheets and images, and a vendor folder to contain any 3rd party client side libraries installed via Bower.
Now lets configure Bower to pull in the client side libraries we want. Add a bower.json file to the root of the project. You can do this manually or via bower init from a command prompt. Add the following to bower.json (these will be generated for you if you used bower init) until it looks something like this:
{
  "name": "AngularApp",
  "version": "1.0.0",
  "authors": [
    "Ryan Wischkaemper"
  ],
  "description": "A basic AngularJS app"
}
Next, add a .bowerrc file to the root of the project. We’ll put on line of JSON in this file:
{
  "directory": "public/vendor"
}
This tells Bower where to install the libraries we want. If this file is excluded or no directory is set, the installation directory will default to bower_components.
Now lets install our first Bower package. Open a command prompt to the root directory of the project, and run bower install -save angular. When it finishes, check your
bower.json file and notice how angular was added in a newly created dependencies section. Continue to do this with any client side libraries you want. For this project, my bower.json looks like this:
{
  "name": "AngularApp",
  "version": "1.0.0",
  "authors": [
    "Ryan Wischkaemper"
  ],
  "description": "A basic AngularJS app",
  "dependencies": {
    "fontawesome": "~4.3.0",
    "angular": "~1.3.13",
    "bootstrap": "~3.3.2",
    "moment": "~2.9.0",
    "angular-animate": "~1.3.13",
    "toastr": "~2.1.0",
    "lodash": "~3.2.0",
    "angular-bootstrap": "~0.12.0",
    "angular-route": "~1.3.13"
  }
}
Source code for this demo is available on Github
At this point, you could use the ASP.Net bundling system to bring your Bower libraries into your Razor pages. An alternative is to automatically include your Bower libraries via an automated task runner such as Gulp or Grunt.